- /
- /
- /
Sliding Doors – Action Zones
By Aaron Dishno Ed.D.
In the previous tutorial, Custom Load Zones, I showed how an Action Zone can be used to trigger when a 3D Object loads.
In this tutorial, I will demonstrate how an Action Zone can make 3D Objects slide in a linear direction.
Set up for the Demo
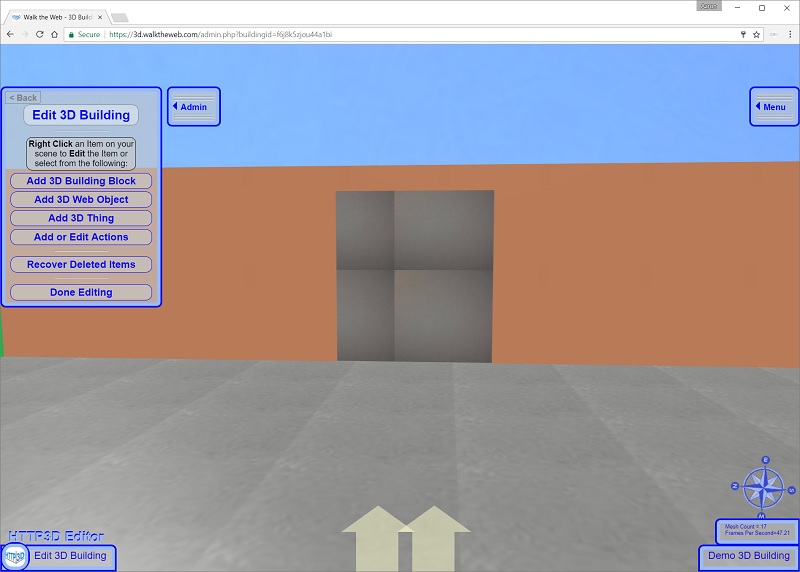
To be complete, I am going to start with a Wall.
Using the steps in Merge Shapes to cut out a Box from the Wall.
First, create an opening by adding a Box
Admin -> My 3D Buildings -> Edit 3D Building -> Add 3D Building Block -> Add Box
with the following dimensions:
- Position: Z = 4.00 X = 49.00 Y = 9.00
- Length: Z = 16.00 X = 2.00 Y = 18.00
- Rotation: Z = 0.00 X = 0.00 Y = 0.00
Under the Advanced Options section, use Merge Shapes – Subtract from another Shape and pick the Wall.
Click Save Box.
(A more detailed steps and screen shots can be found at the Merge Shapes Tutorial).
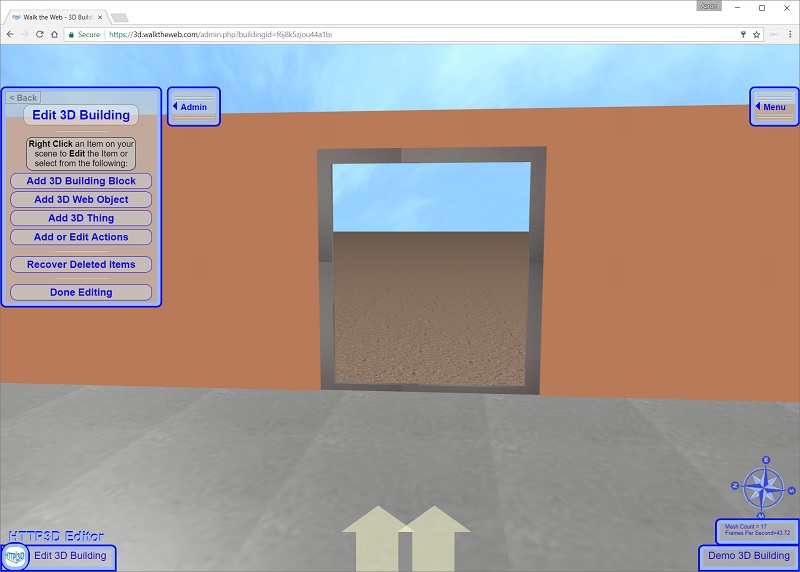
Create the Door
Creating the Door is just like creating anything else. Basically you build a door in the closed position.
Create the Door Frame as a Box:
Admin -> My 3D Buildings -> Edit 3D Building -> Add 3D Building Block -> Add Box
with the following dimensions:
- Position: Z = 4.00 X = 49.00 Y = 9.00
- Length: Z = 16.00 X = 0.50 Y = 18.00
- Rotation: Z = 0.00 X = 0.00 Y = 0.00
You can also change the Texture Image. (I chose metal.jpg from the Stock Images)
Click Save Box.
It should look something like this…
Next, cut a hole in the frame using Merge Shapes and another Box.
Admin -> My 3D Buildings -> Edit 3D Building -> Add 3D Building Block -> Add Box
with the following dimensions:
- Position: Z = 4.00 X = 49.00 Y = 9.00
- Length: Z = 14.00 X = 3.00 Y = 16.00
- Rotation: Z = 0.00 X = 0.00 Y = 0.00
Under the Advanced Options section, use Merge Shapes – Subtract from another Shape and pick the metal Frame Box.
Click Save Box.
Then, Add a Glass Box as a Window to the Sliding Door.
Create the Window as a Box:
Admin -> My 3D Buildings -> Edit 3D Building -> Add 3D Building Block -> Add Box
with the following dimensions:
- Position: Z = 4.00 X = 49.00 Y = 9.00
- Length: Z = 15.00 X = 0.10 Y = 17.00
- Rotation: Z = 0.00 X = 0.00 Y = 0.00
You can also change the Covering Type to Glass.
Click Save Box.
We now have a Closed Door.
It is time to add animation as a Sliding Door Action Zone.
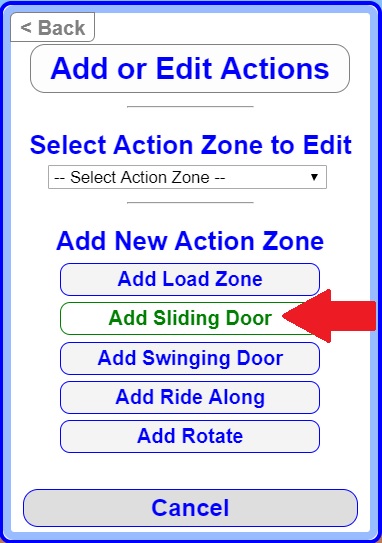
Add a Sliding Door Action Zone
Stand in front of the Door you just created and select Admin Menu Option:
Admin -> My 3D Buildings -> Edit 3D Building -> Add or Edit Actions
Click the Add Sliding Door button.
Similar to a Load Zone, you will now see an Action Zone, a Red and Yellow pole, and the Edit Window.
Give the Action Zone a Friendly Name like Back Sliding Door.
The Red and Yellow Pole can be used as a reference that shows the direction and distance that the Door will Slide.
To test it, Walk into the Action Zone. The Pole will slide.
To reverse the direction of the slider you can rotate the Axis Rotation Y to 180.
You can also adjust the Slide Distance to limit the movement distance.
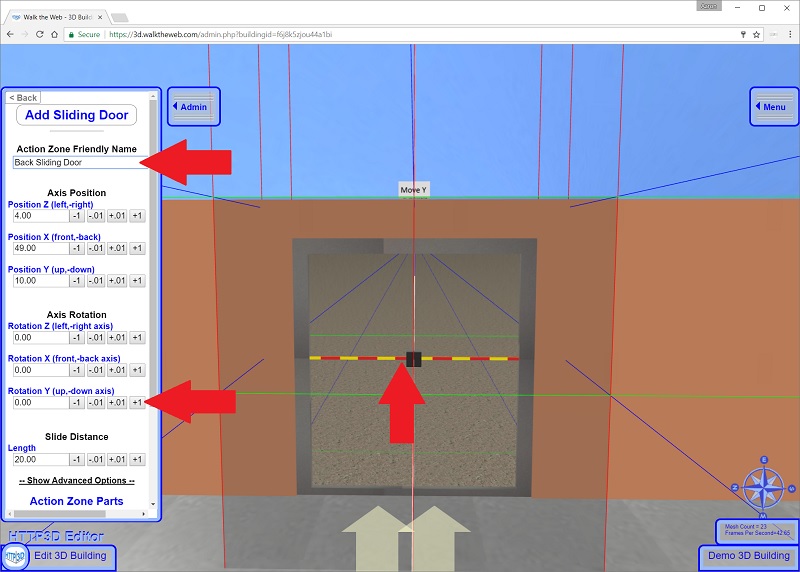
Scroll down and click Show Advanced Options.
By default, when you move the Action Zone Axis Position, the Action Zone moves with it. This is useful for getting close to where you want it. But when you do, sometimes you want the Action Zone in a different place than the 3D Objects that slide (this becomes more critical with Swinging Doors).
If you uncheck the box for Use Axle Position for Action Zone, you can move the Zone separate from the Axle.
If needed or you want the slider to open sooner when you approach it, you can change the Action Zone Size.
Next we need to Attach the Door Parts to the Slider.
Attach the Door Parts to the Slider
To Add Door Parts, Scroll down near the bottom of the Edit Action Zone menu to the section called Action Zone Parts.
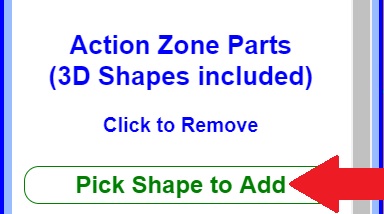
Click Pick Shape to Add, and select the Door Frame.
Then click Pick Shape to Add, and select the Door Window.
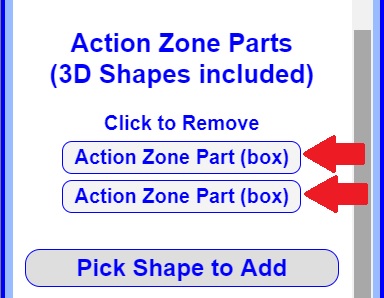
Click Save Action Zone to complete the steps.
You now have a working Sliding Door.
Using this same Sliding Door Action Zone, you can create Expanding Walking Bridges, hidden wall passages, trap doors in the floor, opening sky lights, garage door, moving 3D Shapes, etc…
Next, I will show you how to create a Swinging Door.