- /
- /
- /
Create a 3D Building – 3D Building Blocks
By Aaron Dishno Ed.D.
After you have Created your New 3D Building and understand a basic Common Scale for 3D Objects, it is time to use the 3D Building Blocks or Shapes to build a structure.
Load your 3D Building if you haven’t already,
3D Building Blocks are 3D Shapes
Watch the video and / or follow the step-by-step instructions below.
then select:
Admin -> My 3D Buildings -> Edit 3D Building -> Add 3D Building Block
You will see the following list of 3D Building Blocks:
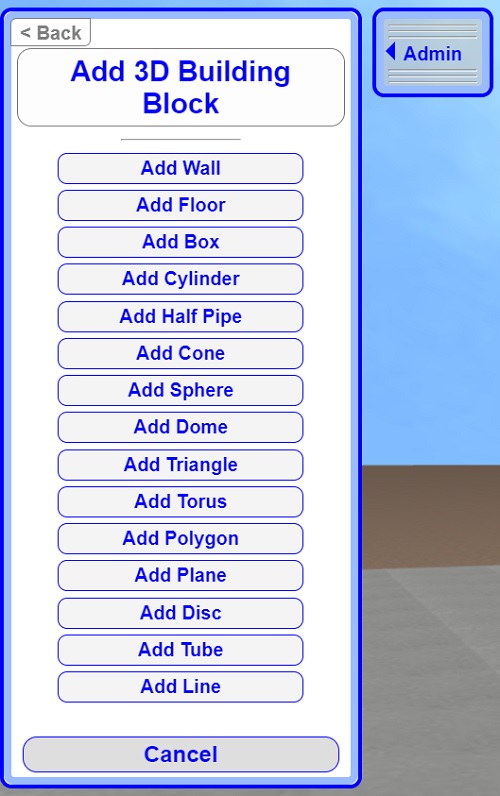
The first 3 items on the list, Wall, Floor, and Box are basically the same shape with different starting dimensions to assist in quick building.
A Floor does have one additional property that can be used in the Editor Settings: ability to turn off and on Floor Collisions (ability to walk through things while you edit it). All of the rest of the 3D Building Blocks fall under the category of Wall Collisions. See Basic Editor Settings tutorial for more information.
For the Tutorial, we will start by adding a box. But before you click the button, you should know:
The item you add will appear directly in front of you,
at your current height and
rotated to the closest angle 0, 90, 180, or 270 degrees.
With that said, Move directly in front of your foundation, near the center and select Add Box.
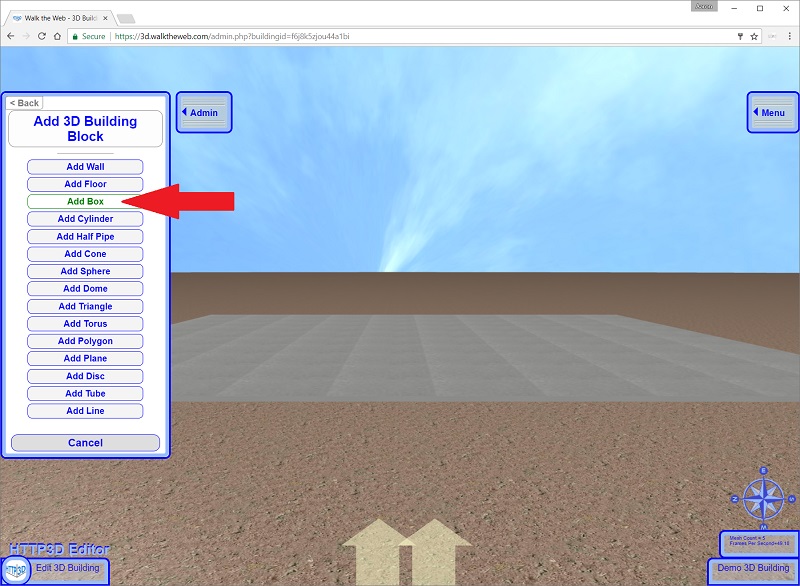
The Box will appear in front of you, selected in the Editor Mode, and the settings for the Box will be displayed in the Admin menu panel.
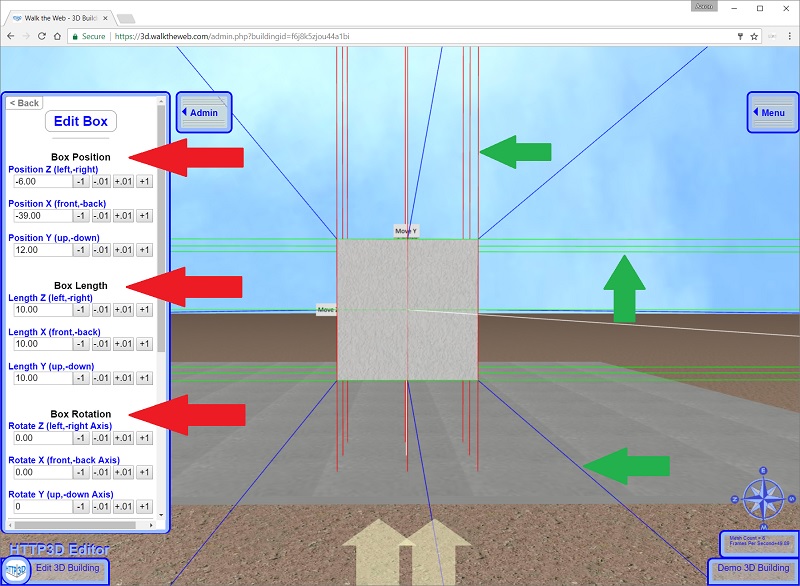
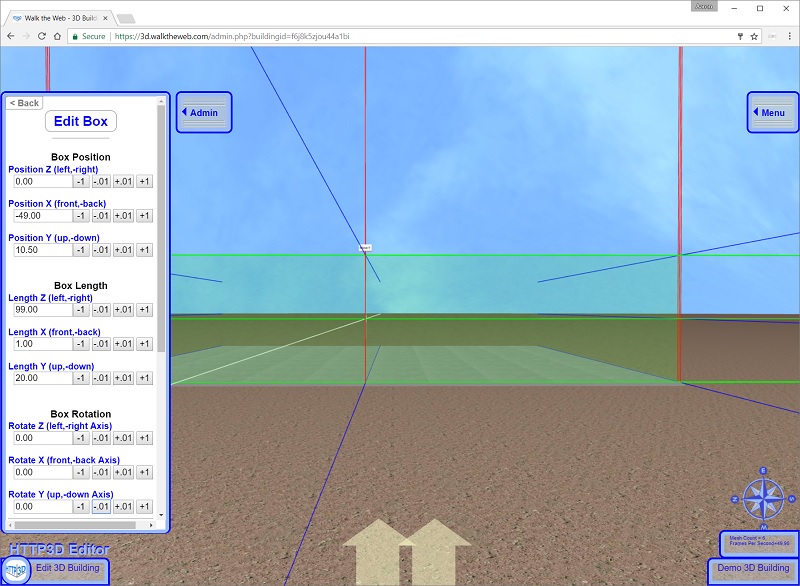
The Red Arrows above show the basic sections of the 3D Building Block Editor:
- Position – Move the Box X, Y, and Z directions.
- Length (Scaling) – Scale the X, Y, and Z dimensions of the Box
- Rotation – Rotate the Box along the X, Y, or Z Axis.
The Green Arrows above are pointing to the Guild Lines used to assist you in lining up objects. They extend in the X, Y, and Z directions and will rotate as you move the object.
There are also White Base Lines to show the Z, X, and Y Axis (labeled). These lines will not rotate with the object.
The Guide Lines and Base lines can be turned off or on in the Editor Settings.
For each setting:
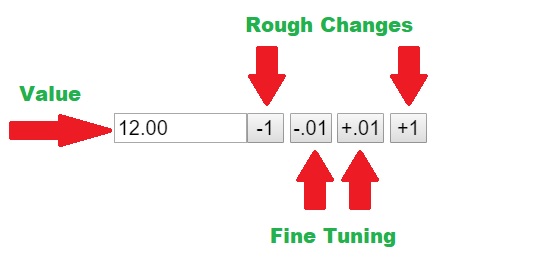
- Direct – You can Directly Type a new value in the Value field, the 3D Box will change or move when you move the cursor to another field on the form menu.
- Rough Changes – You can either click once to move little or hold down the button to change the value repeatedly. Rough changes will help move, size or rotate the Box to where you want it to be.
- Fine Tuning – These buttons are used to slowly change the position, scale, or rotation.
The Position is calculated from the center of the Box or 3D Building Block. So when you change the length (scaling) of the Box in any direction, both ends move.
Test the various basic settings, then Set your Box to match the following settings:
- Position: Z = 0.00 X = -49.00 Y = 10.50
- Length: Z = 99.00 X = 1.00 Y = 20.00
- Rotation: Z = 0.00 X = 0.00 Y = 0.00
Scroll to the bottom of the Admin menu and select Save Box.

If you need to make more changes to the Box, just move your mouse over the Box and Right Click to open the Editor Settings again.
Click Save Box again when you are done.
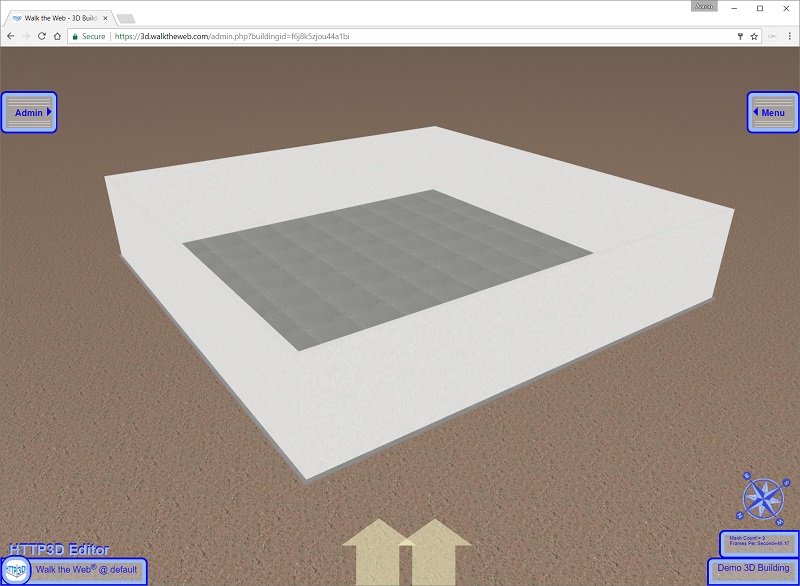
Now create 3 more walls around the border like the first.
Here is a hint, Right click a Box, Pan and Walk near where you want the new Box, scroll down to the bottom and click Create a Duplicate Item. Duplicate items will have the same X, Y, and Z Lengths (Scaling), Y Position, and X and Z Rotation as the first. All you have to set is the X, Y position and Y Rotation.
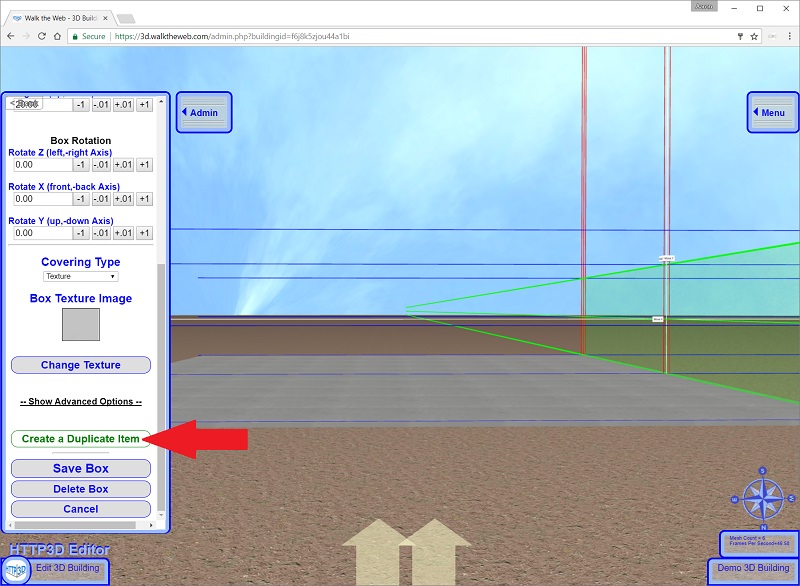
Create a Duplicate Item button will add a new Box and open the Editor Settings automatically.
The settings for each Box should be:
Box 2:
- Position: Z = 49.00 X = 0.00 Y = 10.50
- Length: Z = 99.00 X = 1.00 Y = 20.00
- Rotation: Z = 0.00 X = 0.00 Y = 90.00
Box 3:
- Position: Z = 0.00 X = 49.00 Y = 10.50
- Length: Z = 99.00 X = 1.00 Y = 20.00
- Rotation: Z = 0.00 X = 0.00 Y = 0.00
Box 4:
- Position: Z = -49.00 X = 0.00 Y = 10.50
- Length: Z = 99.00 X = 1.00 Y = 20.00
- Rotation: Z = 0.00 X = 0.00 Y = 90.00
Your 3D Building should now look like this
Next, I will show you how to apply Coverings and Textures.
1 thought on “Create a 3D Building – 3D Building Blocks”
Leave a Reply
You must be logged in to post a comment.
Hi again, well that was a wild ride! After reading about and watching the ‘common scale for measurement’ tutorial, I realized how much math is involved. No wonder Aaron loves creating 3D! I know, I should know it too, but I’m a different kind of thinker. Getting a lot out of visual aids is why the videos are helping so much. Taking notes while learning the concept of 3D scaling includes a tip that the scales will change according to ratio of community or building.
OK so we move on the ‘Create a 3D Building-3D Building Blocks. After adding a box, the settings for the box appeared-cool:) Again the written and video tutorials prove to help a great deal. Going the pace of a new student…. clicking, pausing and looking back between two screens on the computer often….lol
Walls are done but OOPS they don’t line up, I made a maze lol….gotta find wall #1 again and check scales. OK it’s done, phew I see 4 aligned walls….looking forward to what’s next:)
Comments? Who’s with me? haha