- /
- /
- /
Editor Settings
By Aaron Dishno Ed.D.
When you are creating 3D Buildings, 3D Communities, and 3D Things, we have a number of built in settings to assist in making your life easier.
These settings can be found at
Admin -> Editor Settings
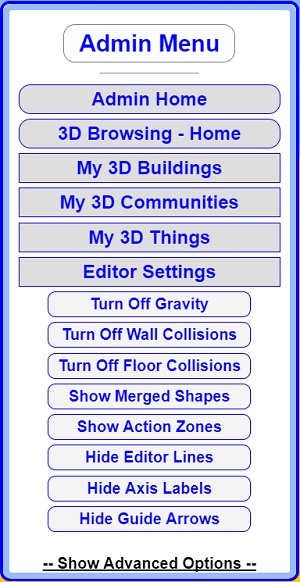
Turn Off or On Gravity
Click the button Turn Off Gravity. The text on the button will become Turn On Gravity to show it is off.
Now when you Pan your view up and Walk forward, you will leave the ground. This is very useful for gaining a birds-eye view of something you are working on.
It is important to note that this only changes the Editor View gravity and the production 3D Browsing users will not be affected.
Note: The 3D Community Gravity is set in the 3D Community – Settings and Tools and will affect production.
Click the button Turn On Gravity to return to normal gravity.
Turn Off Wall Collisions
Click the button Turn Off Wall Collisions. The text on the button will become Turn On Wall Collisions to show it is off.
You will now be able to walk through Walls and other 3D Building Blocks.
This is useful for creating 3D Buildings or other 3D Objects and being able to easily move in or out of the 3D Building before you add doors (or without the need to maneuver through doors).
Turn Off Floor Collisions
Click the button Turn Off Floor Collisions. The text on the button will become Turn On Floor Collisions to show it is off.
You will now be able to walk through Floors.
This setting only applies to the 3D Shape added with the Add Floor button. This setting is often combined with turning off gravity (or you will fall through floors when you walk).
Show Merged Shapes
Clicking this button will show any Merged Shapes to enable you to be able to select them for editing. The Merged Shapes will appear like glass.
Merged Shapes may take on Wall Collisions when they appear (unable to Walk through them). You May want to also turn Off Wall Collisions if needed.
Merged shapes are used to Cut Out sections of other shapes or combine multiple shapes. See Merging Shapes for more information.
Show Action Zones
Clicking on this button will show any Action Zones. They will appear as a gray tinted glass and can include axles for rotations or direction.
Action Zones are 3D Shapes that have special properties that may do any of the following:
- Load or Unload 3D Shapes from your scene.
- Trigger and define a sliding Door.
- Trigger and define a Swinging Door.
- define a Ride Along movement.
- define an object(s) rotation.
- or similar triggered movement.
Action Zones are not selectable on the screen for editing, you will need to edit them in the Admin menu:
Admin -> My 3D Buildings -> Edit 3D Building -> Add or Edit Actions
Admin -> My 3D Communities -> Edit 3D Community -> Add or Edit Actions
Admin -> My 3D Things -> Edit 3D Thing -> Add or Edit Actions
Hide Editor Lines
Editor Lines are the Red, Green, and Blue lines that extend from a 3D Building Block when you are editing it. They assist in lining up objects in the 3D Scene.
This button will Show or Hide the Editor Lines.
Hide Axis Labels
Axis labels are the small box text that says Move X, Move Y, or Move Z to show orientation. If you are working with small 3D Building Blocks, the labels can get in the way of your view.
This button will Show or Hide the Axis Labels.
Hide Guide Arrows
Guide Arrows are the two arrows on the bottom of the screen that helps the user align their movement especially through doors.
This button will Show or Hide the Guide Arrows.
Advanced Options
The advanced options section is used for developers to view the contents of various loaded http3d arrays. When clicked, the item will display the contents and pertinent settings in the browser Console Log.
The Console Log can be viewed using the browser development tools (often displayed when you press the F12 key on your keyboard.
Next, I will show you how to add 3D Web Objects.